Friday, August 17, 2012

Fast and Cool - Fruit Pizza

The temps of this summer have been over the top! We all want cooler weather, and cooler things to eat. When we got a half-box of fresh Colorado peaches I wanted to do something cool with them - baking a pie seemed like too much hot effort! Fruit Pizza was perfect. Eating these peaches like an apple-in-hand is heavenly tasty, but the Fruit Pizza dessert seemed just a little more fancy!
Peaches come from China and have been cultivated at least since 1000 B.C.E. The peach is special in Chinese culture - the tree is considered to be the tree of live and peaches are symbols of immortality and unity. Peach blossoms are carried by Chinese brides. Peaches are a good source of vitamins A, B, and C. A medium peach contains only 37 calories. Most peaches in the U.S. are grown in California or Georgia (the Peach State), but here in the midwest we anxiously await the arrival of Colorado peaches.
I did half of this recipe - easy to divide since it uses refrigerated sugar cookie dough. Using ready made dough also makes it that much quicker to put together. Use Fruit Fresh or lemon juice to keep the peaches from turning brown.

Fresh Fruit Pizza (makes 10-12 servings)
1 16-oz package refrigerated sugar cookie dough
1 8-oz package cream cheese (use fat-free to cut calories)
1/2 cup powdered sugar
1 teaspoon vanilla
Assorted fresh seasoned fruit such as strawberries, blueberries and peaches
Powdered sugar
I used 1/2 package of cookie dough
& 1/2 recipe

Raspberries were a good taste
and color contract for the
peaches
Preheat oven to temperature recommended on cookie dough package. Cut cookie dough into 1/4-inch slices (or break pieces apart) and place close together in a well-buttered 12-inch pizza pan. Press cookie dough together to close all open spaces and to cover pan completely.
Bake in preheated oven 10-15 minutes or until golden brown. While still warm loosen cookie edges with a thin metal spatula to make serving easier. Cool.
Beat cream cheese until soft and fluffy. Add sugar and vanilla. Spread mixture evenly over cookie crust. Arrange fruit in an attractive pattern over top. Dust with powered sugar or drizzle with glaze of melted jam or jelly. Chill, cut into wedges to serve.


Saturday, August 11, 2012

National S'more Day

Yesterday, August 10 was National S'more Day. I intended to write this blog earlier - but we should be able to enjoy S'mores any day, not just on August 10, right? The crispy graham cracker + gooey marshmallows + melty chocolate is a favorite everyone loves. S'mores have been enjoyed since around the turn of the 20th century, when commercial marshmallows were becoming more available. It is assumed that s'mores were invented by campers, and have long time been a campfire favorite. The traditional method is to toast a marshmallow over a campfire, then sandwich it between two graham crackers with a piece of chocolate.
That's still a popular way, but you don't have to camp to enjoy s'mores (thank goodness!). Before we had kids, we ate like kids, and hot dogs and s'mores were Sunday evening supper. The microwave makes it easy to combine and heat the marshmallow-chocolate-graham combination without charring it. Those with gas ranges sometimes use the flame of the burner to toast the marshmallow. I've even seen 's'more kits' in stores with a small heat source for tabletop prep. We had an enjoyable evening with the Texas niece toasting marshmallows over their backyard fire-pit and making s'mores with gourmet chocolate bars. Today one of our treats is a type of s'more made with graham crackers, marshmallow fluff spread and Nutella spread.

If I do go camping, here is a version I want to try, called Campfire Cones.
Campfire Cones (need sugar ice cream type cones, peanut butter, chocolate chips, mini-marshmallows, bananas, foil)
Chop bananas (kids can do this with a plastic knife). Spread peanut butter inside the cone, put in bananas, chocolate chips and marshmallows. Wrap in foil and put over the hot coals for 5 - 10 minutes, turning a couple of times. Unwrap and enjoy.

Here's another recipe that I'm saving for the holidays... (from cookingclassy.blogspot.com)
S'more Bites - with a Kiss  (makes 12)
6 graham cracker sheets (let them sit out opened for a few days to make them softer)
or 12 Ritz crackers
6 large marshmallows
12 Hershey's Kisses or Rolos, unwrapped
Break the graham cracker sheets in half, and cut into a circle about 2 1/2-inches with a metal cookie cutter (easier if they are softer and less likely to break). Cut each marshmallow into 2 halves. Heat oven to low broil and place oven rack two levels below broiler. Place graham circles in center of cookie sheet and top each with a marshmallow with the cut side down. Place under the broiler for a very short time - watch closely! Once the marshmallows are golden, remove from the oven and top with a Kiss or Rolo in the center of each toasted marshmallow and gently press down. Serve warm.

Tuesday, July 31, 2012

Cookies at Fair Time

Fair week has just ended, and while I didn't do any baking to enter in the competitions, I did bake cookies for the Cattlewomen's hospitality table at the 4-H Livestock Sale. Baking cookies this time of the year reminds me on many 4-H cooking classes and questions I encountered while working. Baking cookies is often the first experience of a new cook as a child learns to bake. As we help children learn this skill, remember that we are teaching life skills and traditions, as well as math, science, and nutrition. Hard to believe all that happens in the kitchen! 
Cookies are a great early project, not only because they are easy and quickly done, but they are also a personal, bite-size bit of comfort food - who doesn't enjoy a cookie and a glass of milk? 
Here's a peanut-butter chocolate chip recipe that goes great with that glass of milk, maybe even followed with a mid-afternoon nap! Doesn't that sound comforting on a hot afternoon?

Chewy Peanut Butter Chocolate Chip Cookies  
Ingredients:
2 stick unsalted butter, room temperature
2 cup light brown sugar
1 1/2 cup peanut butter
2 eggs, room temperature
2 tablespoon vanilla extract
2 1/2 cups plain flour
2 teaspoons salt
1 teaspoon baking powder
1 teaspoon baking soda
1 cup chocolate chips

In a bowl of an electric mixer, cream butter and brown sugar until light and fluffy. Add peanut butter and mix.  Add egg and vanilla extract and mix well.
Whisk together flour, salt, baking powder, and baking soda and add to dough with mixer on low speed until mixed. Stir in chocolate chips. Cover and refrigerate dough for a few hours or overnight (this helps keep the dough from spreading out too much). Preheat oven to 325 degrees and cover baking sheets with parchment paper. Place rounded mounds of dough (about 2 Tablespoons each) on the baking sheets. Bake 15 minutes. Remove when slightly under-baked and let cool on the baking sheets before transferring to a wire rack. Makes about 6 dozen.
(enough to share a few dozen and enjoy the rest)


Thursday, July 26, 2012

Ratatouille - not the movie!

It was me in the kitchen, not Remy, the would-be chef in a favorite Disney movie, but the dish was Ratatouille. That's a french cruisine word for a recipe with humble beginnings. "Touiller", the french word that ratatouille comes from, means to toss food (do we call that a 'food fight' in America?). The ingredients are simple - late summer garden vegetables that are stirred together. It was sometimes called a poor farmer's dish.
This poor farmer happened to have most of the ingredients on hand, fresh from the not-too-plentiful garden and Ratatouille made a wonderful side dish for dinner. The amounts of the vegetables can be varied and substituted according to what you have. The recipe is adapted from Southern Living magazine, and I served it with beef rolls (a new technique I've adapted, that's another blog).

Ratatouille
1 small red onion (or the sweet Vidalia left from the earlier onion rings - blog of June 30)
1/2 (1-lb) eggplant, peeled and chopped
2 Tbsp. olive oil
2 small summer squash, chopped
2 garlic cloves, minced
1 medium-size red bell pepper, chopped
1 medium tomato, diced
1/4 cup chopped fresh basil

Saute onion and eggplant in hot olive oil in a large nonstick skillet over medium-high heat 5 minutes or until tender and light brown around edges. Add squash, garlic, and bell pepper; sauté 5 minutes or until tender. Add tomato, basil, and 1/4 tsp each salt and freshly ground pepper. Cook, stirring constantly 2 to 3 minutes or until mixture is thoroughly heated.

Wednesday, July 25, 2012

Sunday Supper Scones

Sunday Suppers are usually a light affair at our house, sometimes only crackers & cheese. But often its a good time to have a 'breakfast' sort of meal, since scrambled eggs are not my fare at 6:30 a.m.! A new recipe from Taste of Home magazine suggested Biscuit Baking Mix for the base of scones. Sounds easy and quick! Just right for a Sunday Supper.
Scones are traditionally connected with Scotland, Ireland, and England. But history isn't sure who did create these culinary creations. It seems there were few cookbooks, fewer cooking magazines and newspaper columns, and no food blogs in the times before the 1500's. Scones were, and most often are now, round cake-like breads. Originally they were made with yeast and oats and baked on a stone. Today scones are quick breads, somewhat similar to American biscuits. Often they are flavored with nuts or dried fruit to add a sweeter taste. Plain ones may be served with butter and jam (or clotted cream if you're British). They can be quite dry and hard, so I was pleased that this recipe creates a softer more moist product. Scones are usually round and cut into wedges before baking, but can be square or diamond shapes also.
Scones can be prononced two ways, either is correct. In Scotland and Northern England it is "skahn" (rhymes with gone). In the south of England, Canada, and usually in the U.S., it is "skoan" (rhymes with own).
Here's the Cinnamon - Sugar Scones we had. The leftovers were great for a quick morning snack the next day.

Cinnamon - Sugar Scones
Mix together:
3 cups Biscuit Baking Mix (could use Bisquick. I used Aunt Jemima Pancake/Waffle mix)
1/4 cup sugar
Whisk together:
1/2 cup vanilla yogurt
1/3 cup milk
1 Tbs. vanilla extract
Stir into dry ingredients just until moistened.
Stir in:
1 cup cinnamon or chocolate chips (we had the cinnamon - yummy!)

On lightly floured surface, knead dough gently 10 times. (you may need to add a few more drops milk) Pat into a 9-inch circle. Sprinkle with cinnamon-sugar. Cut into 8 wedges; place on ungreased baking sheet. Bake at 375 degrees for 20-25 minutes or until golden.

Wednesday, July 18, 2012

Cool Cooking on a Hot Day

Most of us think of using our slow cookers (or Crock-Pots) in the winter to make soups and roasts, but they are also a great appliance for summer use. Making a casserole or meat in the slow cooker uses less electricity and keeps the kitchen cooler than using the range and oven.
The slow cooker should cook foods between 190 - 212 degrees for best results over a time period of 4 to 8 hours. If the temperatures are below that, the food will be underdone and may not be safe. Over 212 degrees and food may be dried out and overdone. Test the slow cooker by filling 1/2 - 2/3 full of water and set to cook. Check the temperature at 2 hours, 4 hours, and 6 hours. For food safety reasons, the temperature should be above 185 degrees. You may want to check the temperatures at the various levels - warm, low, and high.

From our Greenwood County Cattlewomen's Cookbook of last summer, I chose the Crockpot Pizza (by Anna Curry - our new Ag Agent at the Extension Office) to try for company last week. It is definitely a 'keeper recipe'.

CROCKPOT PIZZA
1 pound hamburger, browned (I used about 1 1/2 pounds)
1 small bag rigatoni noodles (cooked)
2 (8-oz) bags shredded mozzarella cheese
1 can cream of mushroom soup (I used cream of celery, I like that flavor better)
1 onion, chopped
2 small cans pizza sauce
1 (8-oz) package sliced pepperoni
(I also added 1 small can of sliced mushrooms, drained)
Alternate each ingredient in layers two times in a greased crock pot or 9" x 13" pan; beef, noodles, cheese, soup, onion, sauce and pepperoni. Bake 4 hours on low in crock pot or in 350 degree oven for 1 hour.

Wednesday, July 4, 2012

Favorite Food - a winner

As I worked with 4-Hers for many years, and continue to do some judging of 4-H events, one of my favorite events is the Favorite Food Show. In this event, the 4-H members demonstrate food preparation, presentation, safety, and nutrition skills by setting a table with a chosen 'favorite food'. They are evaluated by a judge (that's a fun thing to do - get paid for offering your opinion!), on how they can explain their knowledge of the entry.
I judged the county show in Wilson County this summer, then was asked to also judge the SE Kansas Area Favorite Food Show. Knowing that my choice of winner from Wilson County would be an entry, I asked to judge the other half of the room of junior entries. But when it came down to the final consultation between the other judge and I, this one was a clear winner - again!
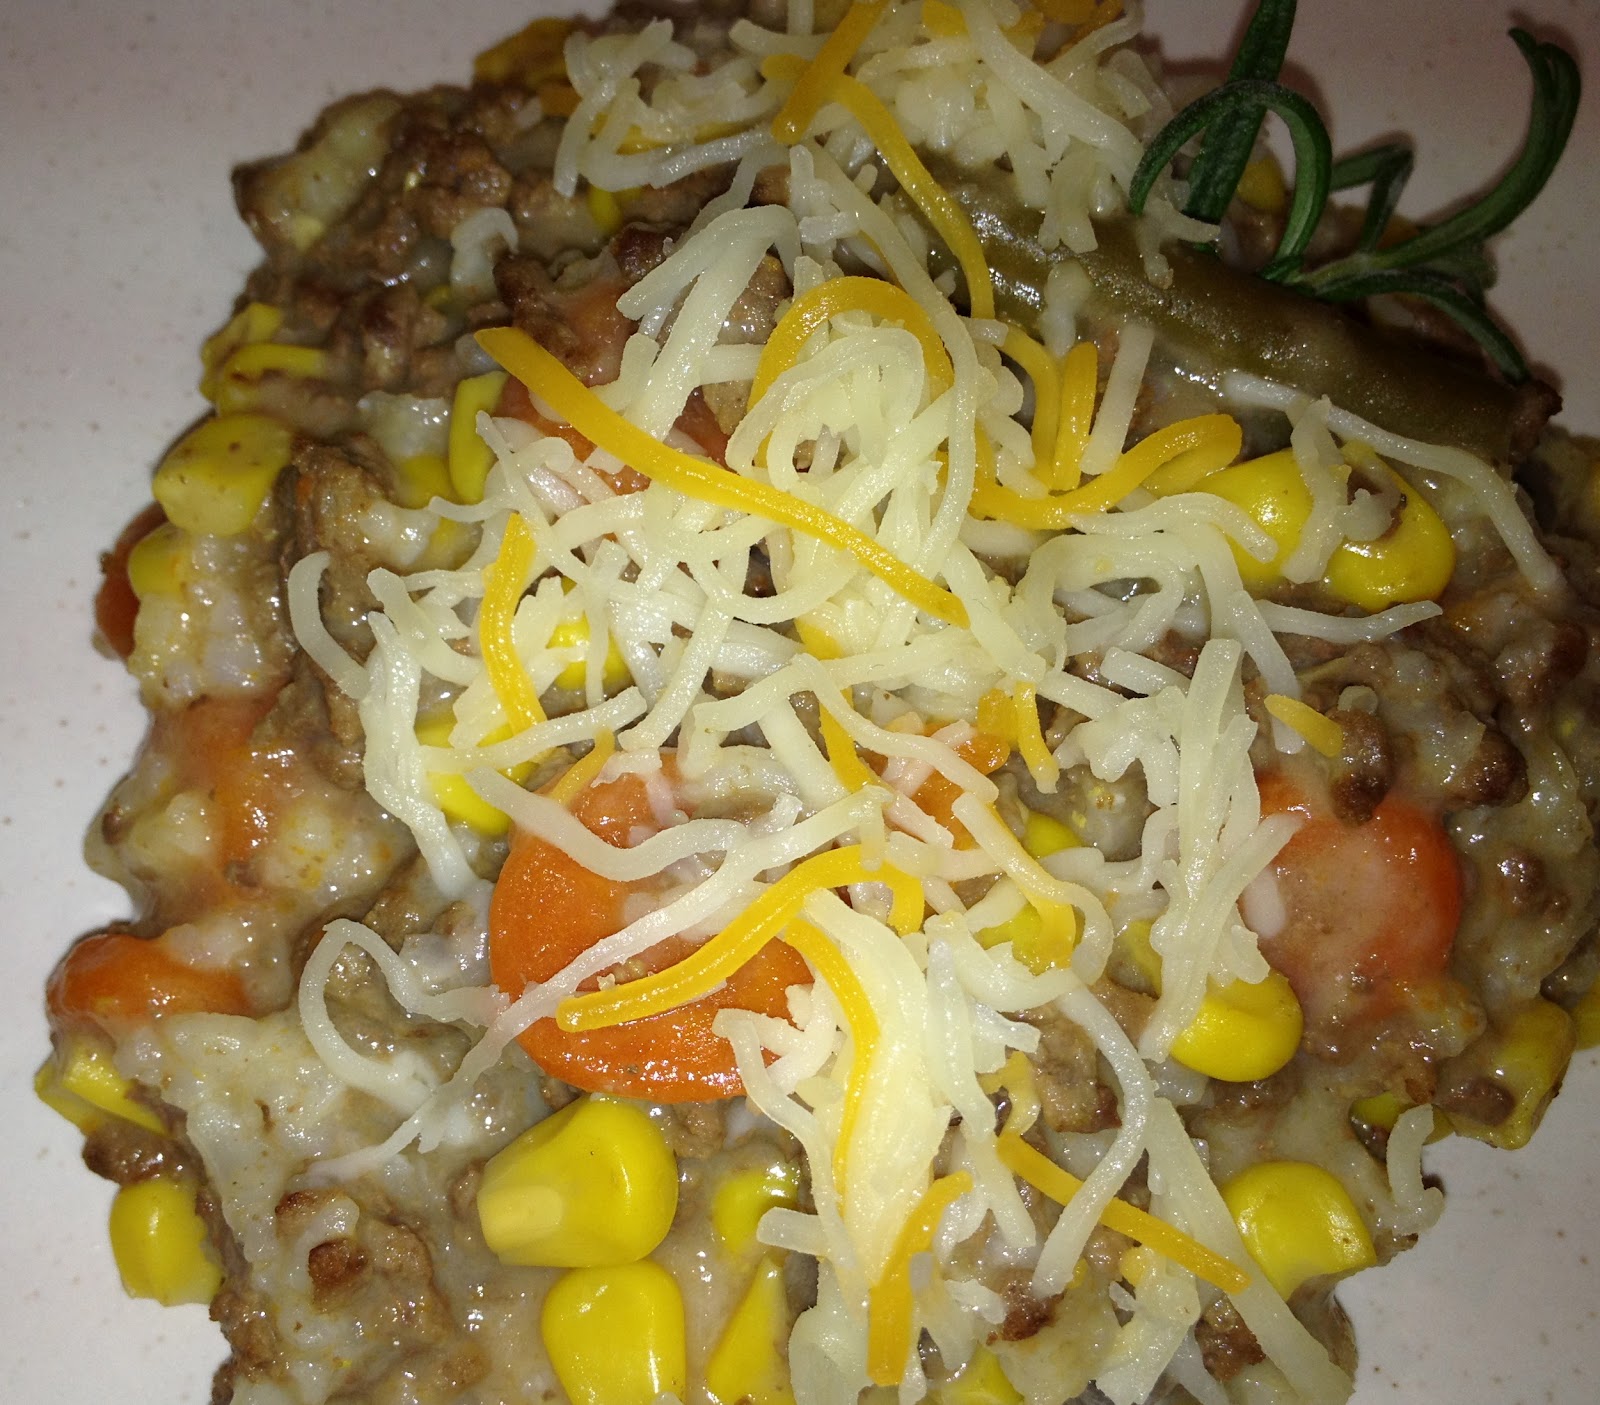
This young 4-Her,  I think she's only 9, had chosen a meal suitable for farm work day and decorated the table accordingly. Served with a salad and roll, it's an easy to fix and quick dinner. The food looks and tastes yummy. I can hardly wait to make it for my farmer.


CHEESEBURGER CASSEROLE

1lb ground beef
1-16oz can green beans
1-16oz can carrots
1-16oz can corn
½ cup instant rice
1 can cheddar cheese soup
1 can cream of mushroom soup

Brown ground beef, drain, place back in pan
along with canned ingredients (not drained) and rice.

Mix and cook over medium heat until
juices are absorbed.

Approximately 6-1cup servings