Showing posts with label cake. Show all posts

Monday, July 20, 2020

Angel Food Cake - a winner!

Since we found the greatest homemade ice cream recipe (May 9 blog post), I wondered what to do with all those egg whites left from the ice cream process. My husband, remembering his childhood and mother's cooking, was quick to suggest "Angel Food Cake, of course". My experience with angel food cake was limited - mostly helping my kids try to come up with a fair entry (and a very sticky kitchen) or a box mix. But I remembered a former 4-Her entering a chocolate angel food cake in fairs past and it always won. I didn't have her recipe but a search yielded one from Taste of Home that promised to be a "contest-winner". Although I haven't taken this to a contest, it is a winner at our house! (even when the granddaughter calls it 'fairy cake')


CHOCOLATE ANGEL FOOD CAKE


Ingredients:
1 ½ cups egg whites (about 10 large eggs)
¾ cup cake flour
1 ½ cups plus 2 tablespoons sugar, divided
¼ cup baking cocoa
1 ½ teaspoon cream of tartar
1 ½ teaspoon vanilla extract
¼ teaspoon salt

Directions:
1.    Place egg whites in a large bowl; let stand at room temperature for 30 minutes. Sift the flour, ¾ cup plus 2 tablespoons sugar, and cocoa three times. 
2.    Add cream of tartar, vanilla, and salt to egg whites; beat on medium speed until soft peaks form. Gradually add sugar (3/4 cup), about 2 tablespoons at a time, beating on high until stiff glossy peaks form and sugar is dissolved. Gradually fold in flour mixture, about ½ cup at a time. Mixture will be thick. 
3.    Gently spoon into an ungreased 10-in. tube pan. Cut through the batter with a knife to remove air pockets. Bake on the lowest oven rack at 350 degrees for 40-45 minutes or until lightly browned and entire top appears dry (internal temperature should be 205-209 degrees). Immediately invert pan; cool completely, about 1 hour. 
4.    Run a knife around the side and center tube of pan. Remove take to a serving plate. 


We like it without frosting. But this frosting recipe was with the recipe from Taste of Home. 

CHOCOLATE FLUFF FROSTING
2 cups heavy whipping cream
1 cup sifted confectioners’ sugar
½ cup baking cocoa
Dash salt
            In a large bowl, beat cream until it begins to thicken. Add the sugar, cocoa and salt; beat until stiff peaks form. Frost top and sides of cake. 


Thursday, March 28, 2019

More Lemons

Lemons taste like sunshine! And we are so ready for sunshine and warm days. These Meyer Lemon Cake Bars are tart, moist, and buttery-rich. They seem like a cross between a brownie and a lemon bar, lemony-sweet perfection. Also from the Meyer Lemons my friend gave me.


MEYER LEMON CAKE BARS


Cake Bar Ingredients:
1 cup (2 sticks) unsalted butter (room temperature)
1 ½ cups sugar
4 eggs
1 tablespoon Meyer lemon juice
2 teaspoons Meyer lemon zest 
1 ½ cup all-purpose flour
½ teaspoon baking powder
1/8 teaspoon baking soda
½ teaspoon salt
Glaze Ingredients: 
1 cup powdered sugar
2 tablespoons fresh Meyer lemon juice
2 teaspoons Meyer lemon zest

Directions: 
1.    Preheat oven to 350 degrees. Butter a 9-inchx9-inch baking pan and set aside. 
2.    In a large mixing bowl or in the bowl of a stand mixer with the paddle attachment, beat together butter and sugar on medium speed until fluffy, about 2 minutes. 
3.    Add eggs, one at a time, beating well after each addition
4.    Add lemon juice and lemon zest and beat on low speed just until combined. 
5.    In a medium bowl, sift together flour, baking powder, baking soda and salt. 
6.    Pour the flour mixture into the butter/sugar/egg mixture and blend. 
7.    Spread the mixture into the baking pan. 
8.    Bake 30 minutes until the cake bars begin to turn golden brown around the edges and are set in the middle. 
9.    Cool for 20-30 minutes. 
10.  Whisk the glaze ingredients together and drizzle over the top of the cake bars. 

Look what a rich yellow color the farm-fresh eggs make! 

Friday, March 15, 2019

When life (or a friend) gives you Lemons

2 Meyer Lemons with an orange (on the right)
Recently a close friend did a quick winter get-away to Arizona. She said it was to visit a relative, but we know she was escaping winter as we wished we could. The area she visited has interesting agriculture that she always tells us about. This trip she brought back Meyer Lemons and was kind to share a couple with me. 

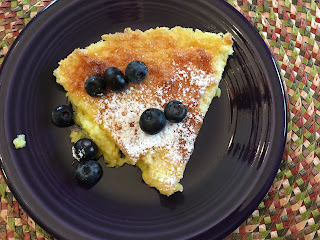
We can't find Meyer Lemons in our store so this bit of southern sunshine was special. These lemons are noticeably larger in size - they looked like a slightly lighter-in-color orange. We had to caution people not to eat them as that. They are sweeter than regular lemons but still have a little tang that would make you pucker. I searched for a special recipe to use my lemons. This Meyer Lemon Pudding Cake was a hit! 

MEYER LEMON PUDDING CAKE       


Ingredients: 
4 eggs, whites and yolks separated
1 cup sugar
5 tablespoons unsalted butter, melted and cooled
¼ cup all-purpose flour
½ cup fresh squeezed Meyer lemon juice (I got this from 1 lemon!)
¼ cup whole milk
Finely grated zest from the lemon

Instructions:
1.   Preheat the oven to 350 degrees. Grease a baking dish with a 6-cup capacity and set aside. (or a larger pan or dish for a thinner cake)
2.   In the mixer bowl, with whisk attachment, beat egg whites on medium-low speed until foamy. Then increase the speed to medium-high and beat until glossy peaks form, about 1-2 minutes. Gently transfer the egg whites from the mixer bowl into a second bowl and set aside. 
3.   In the mixer bowl combine sugar, butter and flour. Add the egg yolks, lemon juice, milk and lemon zest. Mix until well combined, scraping down the sides of the bowl as necessary. With a rubber spatula gently fold in the beaten egg whites, folding in about one-third at a time, until they are just incorporated. 

4.   Pour the batter into the greased baking dish. Transfer to the oven and bake until the cake is set and the top is golden brown. Depending on the size of the baking pan, it could be 30-40 minutes. The cake is done when the pudding layer reaches 172-175 degrees (check with a food thermometer).

5.   Remove from the oven and allow the pudding cake to cool slightly. Dust with powdered sugar and top with fresh blueberries if desired before serving. The cake can be enjoyed slightly warm or cold. 

Friday, June 15, 2018

Rhubarb Dump Cake/Cobbler Revisited


Do you follow the recipe or do you "ad lib"? Can you tell if you'll like a recipe or not by reading it? What's your pet peeve about recipes?
Its been said that baking is a science and cooking is an art. I mostly agree, baking depends on the interaction of ingredients to rise the dough, brown the cake, or set the custard. But I often find recipes that I think could use a bit of 'tweaking', maybe less sugar, or an added ingredient, or a different preparation method. And it is okay to try that! I usually save my trials for the close family unless I'm pretty sure about what I'm doing. My family is good about trying and eating the flops as well as the "save this recipe" dishes.
I'm always looking for quick easy ways to use the frozen fruit I buy in boxes from our UMW fund raiser. So when I saw this dump cake idea it seemed like a winner. Until I read further - a lot of sugar! The original recipe included 1 cup sugar and 1 whole box of jello (which also has sugar). And I usually think dump cakes are dry. So I've altered the recipe - less sugar and 1/2 box of jello and 1/2 cake mix, save the remaining half for the next dump cake. I like the ratio of more fruit and less cake layers.


RHUBARB DUMP CAKE


Ingredients: 
1 pound (3-4 cups) rhubarb, cut into ¼ inch pieces
       if using frozen, allow to thaw some and rough chop the slices
½ package (of a 3 oz package) strawberry jello 
½ package yellow cake mix
1 cup water
¼ cup butter, melted

Directions:
Preheat oven to 350 degrees. Grease a 9x13-inch baking dish. Spread the rhubarb evenly in the bottom of the baking dish. 
Sprinkle the sugar over the rhubarb, followed by the jello, and finally the cake mix. 
Pour the water and melted butter over the top. Do not stir. 
Bake for 30-40 minutes or until the rhubarb is tender and the topping is browned. 

Dump Cakes are just that - a dry cake mix 'dumped' on top
of fruit filling. Not so different from a cobbler, but even easier! 

Ready for the oven with fruit, then cake mix, water, and butter
'dumped' on top. 

Baked and wonderful. 

Friday, July 31, 2015

Hide the Zucchini

There's a new game at our house - hide the zucchini. Our sorry garden failed to do much with the peas, tomatoes and corn we planted, but outdid any expectations with the four zucchini plants we planted. This was about three too many plants!
So, there has been an effort to find new recipes for zucchini! Two from this week are muffins and chocolate cake. I'll be looking for more because there are now several bags of grated zucchini in the freezer waiting for future recipes.


Zucchini Bread (made into muffins)           
My muffins didn't hold their rounded top shape well,
I think because the batter is so moist. I may try
adding oatmeal for a drier batter. 


½ cup plus 2 tablespoons orange juice
½ cup canola oil (I used lemon infused olive oil)
½ cup unsweetened applesauce
3 eggs, lightly beaten
2 teaspoons vanilla extract
3 cups all-purpose flour
4 ½ teaspoons ground cinnamon
1 ¼ teaspoons baking powder
1 teaspoon salt
½ teaspoon baking soda
2 cups shredded zucchini
1 cup chopped pecans
 
Directions:
1.     Preheat oven to 350°. In a bowl, combine orange juice, oil, applesauce, eggs and vanilla. In a large bowl, combine flour, sugar, cinnamon, baking powder, salt and baking soda; mix well. Add orange juice mixture; stir until just combined. Fold in zucchini and pecans.
2.     Pour into two 8x4-in. loaf pans (or 24 muffin cups) coated with cooking spray. Bake 60-65 minutes (22-25 minutes for muffins) or until a toothpick inserted in center comes out clean.

I have found that a more sure way of checking for doneness is with a food thermometer. When muffins are completely baked, the internal temperature will be 120°.  These still looked moist on top, and I would have baked them longer and perhaps overbaked them if depending on appearance. They are a very moist product, zucchini makes most baked goods very moist. I recommend keeping them in the refrigerator.

CHOCOLATE ZUCCHINI CAKE                                    
I didn't even get the photo before
a piece was cut out!

 ½ cup (8 tablespoons) butter
½ cup vegetable oil
1 ¾ cups sugar
1 teaspoon vanilla extract
1 teaspoon baking soda
½ teaspoon baking powder
½ teaspoon salt
2 large eggs
½ cup sour cream buttermilk, or yogurt
2 ½ cups all purpose-flour
¾ cup baking cocoa
2 teaspoons expresso powder, optional but tasty
3 cups shredded zucchini
½ cup chocolate chips

Directions:
1.     Preheat the oven to 325° F. Lightly grease a 9x13-inch pan.
2.     In a large mixing bowl, beat together the butter, oil, sugar, vanilla, baking soda, baking powder, and salt until smooth.
3.     Beat in the eggs.
4.     Stir in the sour cream, buttermilk, or yogurt alternately with the flour.
5.     Add the cocoa and espresso powder, mixing until smooth.
6.     Fold in the zucchini and ½ cup chocolate chips. Spoon the batter into the prepared pan.
7.     Bake the cake for 30 – 35 minutes, until the top springs back lightly when touched, and it seems set. (I needed a few more minutes until the top ‘set’.)
8.     To ice the cake: Slide the cake out of the oven, sprinkle it evenly with 1 cup chocolate chips, and return to the oven for 5 minutes, or until a cake tester (toothpick) inserted in the center comes out clean.
9.     Remove the cake from the oven, and use a cake spatula to spead the chocolate chips into a smooth glaze. Cool on a rack.
My note: I didn’t find this glaze method very satisfactory, so I used a ready made frosting which can be thinned to glaze consistency in the microwave.

Many are not familiar with the cake batter mixing method of alternately adding dry and wet ingredients. I remember being taught this in 4-H Foods many years ago, and that you start and end with the dry ingredients, but wasn’t sure why, except it incorporates the ingredients better. From King Arthur Flour’s website, here are the explanations.
First, whisk dry ingredients together to evenly incorporate the ingredients and avoid lumps. Start and end with dry ingredients because there is usually more of the dry ingredients then the wet  ingredients.
This alternating of ingredients in smaller amounts is to not ‘shock’ the air out of the batter by dumping in a lot of flour or splashing in a lot of liquid all at once. By adding these ingredients a little at a time the air bubbles are preserved and the cake will be lighter.
This method also helps the butter batter absorb the liquid more easily. Otherwise, the eggs and butter or oil could only hold so much liquid and the result would be a separation of the batter, which makes a heavy cake.
Starting with the flour brings the batter together to help absorb the excess liquids and helps prevent the batter from separating. This also helps make a lighter cake.

There’s your food science lesson for the day!